A week to go before hand in, I went to tutorial to show Chris my book. The feedback I got was good and he was impressed with the outcome and only hand one criticism about how much I had cut out for the tracing pages as it is hard to read the letters that are printed on the page behind it. But he did mention it made the viewer turn the page to then read what was behind it. As well as this he questioned certain parts of the book such as why I chose the effect on the portraits and why they were facing out of the book. I explained my decisions which I am going to probably going to have to do in the presentation.
I also asked about the presentation that we have to do once we have handed in our work, it is only a 20 minute talk explaining our final major project outcome and anything that we are unable to get across from just our handing in our work. Chris mentioned to bring in my other book that I haven't cut out the pages just to show the difference between the two. This next week I am going to finish my evaluation on my project and complete a script and ideas to present in the 20minutes.
Looking back at the last few months it has been rather stressful but exciting experience, from the first few weeks I was very nervous and didn't think it was going to be possible to get this completed but int he last few weeks and leading up to hand in I have enjoyed receiving the book and doing the final touches. I look forward to showing my friends and family the final outcome of the book, especially everyone who helped with their memories.
Friday 3 May 2013
Thursday 2 May 2013
Receiving book and final touches
A week after sending my book of to be printed by Apple I received it through the post. I had two copies print for now so that if something went wrong with one I had the other as back up, if not I had a copy for myself. I am easily able to print it off again as it is saved on my own person computer so would be not problem if necessary and because I have still got just over two weeks till hand in I am will have plenty of time.

As you can see I created the front cover using some of the portraits that I didn't use in my book, I chose to use the side profile images in the book and decided that they should be facing out of the book with the memory behind them. This is because unless you are really asked about a memory or a are provoked by a location or object you don't think about it 24/7 and is stored at the back of your mind, this is how I came to place my images.
So with getting a plain white page in between to potentially add in the acetate, I was very reluctant to cut them out as I didn't want to ruin what had been printed. It took me a few hours to sit and mark out how much I was going to cut off. But I had thought about the process for a while not and had brought some strong double sided tape. Using a guillotine to make sure it was straight I cut the pages out and stuck the acetate in and to cove it, I put a strip of white paper overt he top. It took me a while to do as I was nervous about getting them perfect, with only a few hiccups of sticking them down when it got to the last few I had completed the book.
It had been delivered in a cardboard cover with the Apple logo on, but to make it suitable for hand in I made my own little logo/cover.

Putting together and printing
After much research and going to many printers about publishing my work and talking to them about my tracings. I decided to get my book made by Apple. Now owning a mac book I was able use the iPhoto to create my own outcome and still have it stored if I wish to change and re print the book. I decided on using Apple as I have used them before for previous printed products and I know that their printing and paper is of a good quality. I found it very easy setting my book out on the computer once I had all my images edited and It was simple to add or delete pages where ever I needed to.

My only problems with doing it on this was, one I had only a selection of fonts that I could use and was unable to added any new ones, this was ok as I had a smaller selection to choose from, however some of the others I had looked at on Dafont website would of been more suitable. Secondly, I had problem with the front cover, I had already designed and edited it in Photoshop but I wasn't sure once I had put it on whether it looked right with the white where the title was. I over came both of these by asking friends opinions and about what they thought look right and what appealed to them.
Whilst I was out shopping one day I found a lovely poem about memories on a plaque, it was so beautiful and really stood out at me so I decided to use it within my book to start it of with something to make you think about your own memories you have, even if you haven't given any in this book. You can create your own still life image in you head.
Before sending off to be printed I had to come up with a title for the book. It took a few weeks of thinking and looking at different memory quotes for the title 'Unnoticed Imprints' to pop into my head. I feel this is a good choice as you don't often think about memories until something triggers them, and then the are imprinted in your mind but never forgotten.

A screenshot of the Apple iPhoto screen. There was so many option to create an individual piece of work, from design of front cover, hard, soft or wire bound books, it really was easy to create.
My only problems with doing it on this was, one I had only a selection of fonts that I could use and was unable to added any new ones, this was ok as I had a smaller selection to choose from, however some of the others I had looked at on Dafont website would of been more suitable. Secondly, I had problem with the front cover, I had already designed and edited it in Photoshop but I wasn't sure once I had put it on whether it looked right with the white where the title was. I over came both of these by asking friends opinions and about what they thought look right and what appealed to them.
Whilst I was out shopping one day I found a lovely poem about memories on a plaque, it was so beautiful and really stood out at me so I decided to use it within my book to start it of with something to make you think about your own memories you have, even if you haven't given any in this book. You can create your own still life image in you head.
Before sending off to be printed I had to come up with a title for the book. It took a few weeks of thinking and looking at different memory quotes for the title 'Unnoticed Imprints' to pop into my head. I feel this is a good choice as you don't often think about memories until something triggers them, and then the are imprinted in your mind but never forgotten.
Completed drawings
Whilst home for Easter I completed all of my drawings that I wish to put into the book. From the start I have said about putting these onto tracing paper and I have been asking different printers whether they are able to print on tracing paper so it can be included in the book to start with. But after doing this I have not been successful in finding any where that will print on tracing paper, so my other option is to print it onto acetate. This is still a perfectly good option and gets my personal touch in the book just do not think it will have the same effect. As well as this I am going to have to get the book printed with a black page and cut out this page and stick the acetate in myself, which is another obstacle I am going to face, like how am I going to cut it and make sure it is the right size? Will it ruin the page if I cut it? What am I going to use to stick it in with?
These few things I am going to think about and research to see what will work best for the outcome of this book. I am hoping that this isn't going to cause a problem for the finally result of my book. I will get it them printed onto acetate though so one I have them to add into the books and then I will be able to have a play around with different materials to get them stuck in.
These few things I am going to think about and research to see what will work best for the outcome of this book. I am hoping that this isn't going to cause a problem for the finally result of my book. I will get it them printed onto acetate though so one I have them to add into the books and then I will be able to have a play around with different materials to get them stuck in.
Week 9
Well it has got to the last few photoshoots of my project and I have been sourcing the final obscure or hard to find objects. It has been quite an obstacle to overcome when doing these shoots. I've been having to contact different places for locations and calling on friends and family and even my place of work for certain things to help me out and make the still life images work. This next week I would really like to get the most of these still life shoots done, I know there are a few I can not do till the week after but I would like to get the majority done now so that I have plenty of time to set out the design and layout and make it coherent and get it sent off early enough so I am able to make any changes if there is something wrong or that I don't like.
I Have also been looking through all of my images and I did a couple of still life ones in the studio and I don't think they will work with all the others that I have done on location so I am planning on re shooting them in this week, even though they are more fashion photography (as you can see below). I am glad that I am able to re shoot these and make them consistent with the other images that I have done.
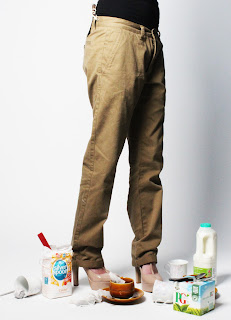

I am very close to getting everything finished and putting the book together, this week I am also going to finalise my research on printing the drawings and where to get the book printed. I am very excited and nervous for this to be coming to an end, but can not wait to see the end outcome.
Messing Around with Portraits

 To the left and below you can see all the different angles I took for the portraits. This was important to do so I could decide which one was the perfect way to choose to have next to the still life. I feel that the front view would be too simple and not as affective as say the side view. Having some obscure will make people stop and look at it and think, why? Why is it that way? Especially in the case if I chose the image of the back of the head. But to make sure there is continuity I am going to have to keep them all the same throughout the book. I had thought about having the portraits turning as they go through the book, so one front the next facing left then back and the right side, however I think this would mean too much would be going on and not make much sense to the reader.
 Lastly I got got each person to pull a funny face this was just incase I felt like I wanted to put a page in the back that was funny, on the other hand this could ruin the style of the book so I may re consider.
I have now collected all of my portraits so it is just the still life mages that I need to finish. It is finally all coming together and is very exciting. Once I have everything I can make final decisions like which images to put where as well as title and contents page.


Subscribe to:
Posts (Atom)